Splitting an OBS Stream to multiple YouTube Channels
Recently Joel Media needed to distribute a live stream from OBS Studio to four YouTube channels simultaneously. OBS Studio itself doesn’t provide a way to define more than one output, therefore we had to find a way to split the stream into four.
This method will work with any streaming software.
#TL;DR
The splitting service is a Docker container we are running on our server. The container is based on the image tiangolo/nginx-rtmp. The setup is very simple, you can find the repository here: https://github.com/lhermann/nginx-stream-splitter
#Setup of the Server with Docker and Docker Compose
If you don’t have one, get yourself a dedicated server running Linux, preferably Debian or Ubuntu. The server doesn’t need to be powerful, it only needs a good internet connection.
I recommend checking out Hetzner’s Server Auction, where you can rent retired servers for a nickel and a dime.
Next, install Docker and Docker Compose on your server. This should be as simple as running the following command:
sudo apt-get update
sudo apt-get install docker-ce docker-ce-cli containerd.io
sudo curl -L https://github.com/docker/compose/releases/download/1.25.3/docker-compose-`uname -s`-`uname -m` -o /usr/local/bin/docker-compose
sudo chmod +x /usr/local/bin/docker-compose
Since this is not the focus of this guide I am skipping the details. If Docker is all new to you check out the official documentation https://docs.docker.com/engine/install/debian/ and https://docs.docker.com/compose/install/. It is easy to learn.
Check if you get some meaningful output with these commands and then we are good to go.
docker --version
docker-compose --version#Setup of the Livestream Splitting Service
Navigate to your home directory and pull my git repository.
cd ~
git clone https://github.com/lhermann/nginx-stream-splitter.git
cd nginx-stream-splitter
Now make a copy of nginx.example.conf and rename it to nginx.conf. Then open it with a text editor of your choice, like vim or nano.
cp nginx.example.conf nginx.conf
vim nginx.conf
The file should look something like this:
rtmp {
  server {
    listen 1935;
    listen [::]:1935 ipv6only=on;

    application restream {
      live on;
      push <Stream URL>/<Stream Key>;

      # Example:
      # push rtmp://x.rtmp.youtube.com/live2/1234-1234-1234-1234;
    }
  }
}
This configuration file decides how you talk to your splitting service and to which destinations it sends a copy of your stream.
- The number after
listenis the port, in this case,1935, the standard port for RTMP streaming. - The string after
applicationis the path where you can talk to your service. This path is public, if you want to make it a little more secure, you can use a random string. pushis where you define your YouTube Stream URL and key, as shown in the example. You can add as manypushdirectives as you want, each on a new line.
When you finished editing the configuration file, start the service.
docker-compose upWhenever you make changes to the config file, you have to restart the service with docker-compose down && docker-compose up. You can also run it in the background with docker-compose up -d.
The splitting service is ready to go. Now let’s set up the OBS studio.
#OBS Studio Setup
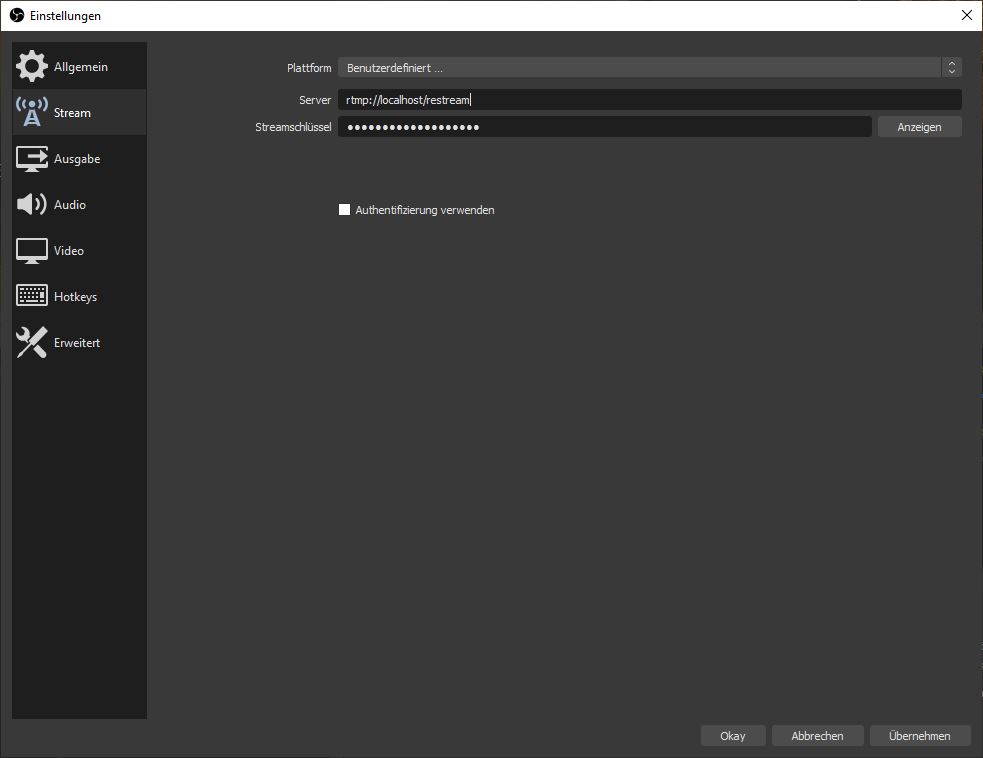
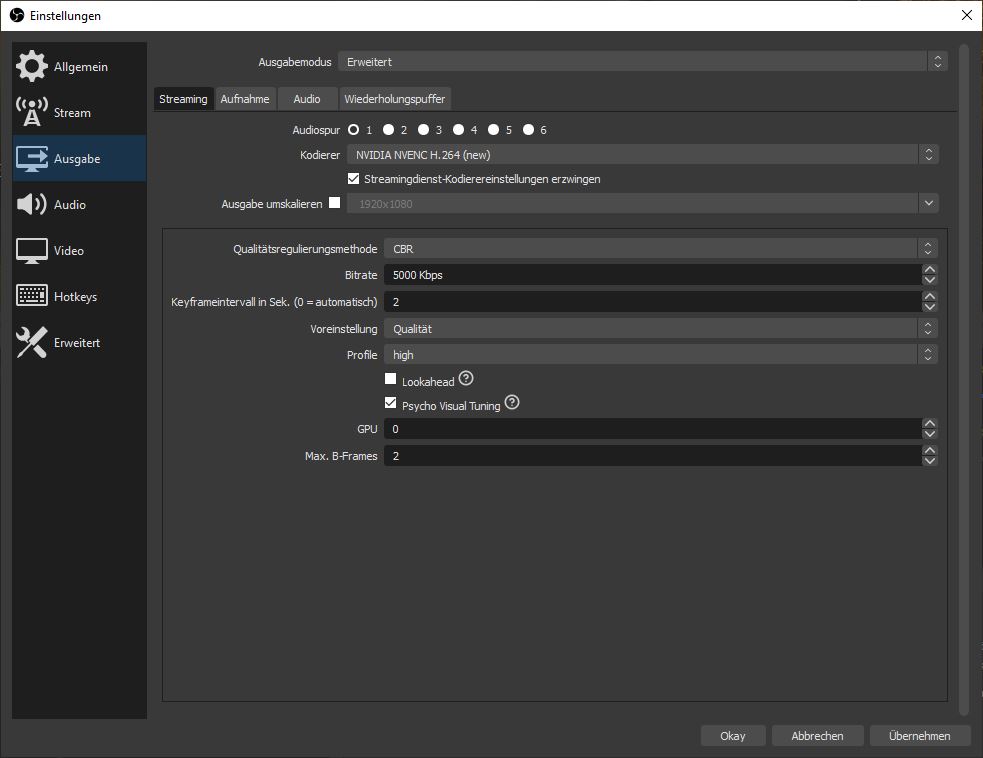
Adopt the settings from the screenshots below. Our OBS install is set to German, but you should be able to find the corresponding configs in your language.
On the “Stream” settings tab select:
- Service:
Custom... - Server:
rtmp://your.domain.com/restream - Stream Key: leave empty
On the “Output” settings tab:
- Output Mode:
Advanced - Encoder:
x264or similar - Bitrate: at least
5000 Kbps(otherwise YouTube complains) - Keyframe Interval:
2(at least every 2 seconds, otherwise YouTube complains)
That’s it. Once you hit “Start Streaming” in OBS you will receive the signal on all the YouTube Channels you configured before.

